Objective
In this lab you will learn how to secure an API using oAuth 2.0. The API you are securing is named ‘Payments’ and it has already been created for you. The instructions will guide you through how to create an oAuth 2.0 provider and then how to secure the ‘Payments’ API using the oAuth 2.0 provider you create.
What is oAuth 2.0?
Before we go further, let’s take a look at the definition of oAuth 2.0:
“The OAuth 2.0 authorization framework enables a third-party
application to obtain limited access to an HTTP service, either on
behalf of a resource owner by orchestrating an approval interaction
between the resource owner and the HTTP service, or by allowing the
third-party application to obtain access on its own behalf.”
Components used in this Lab
The following diagram outlines the key interactions that we will be building in this lab.
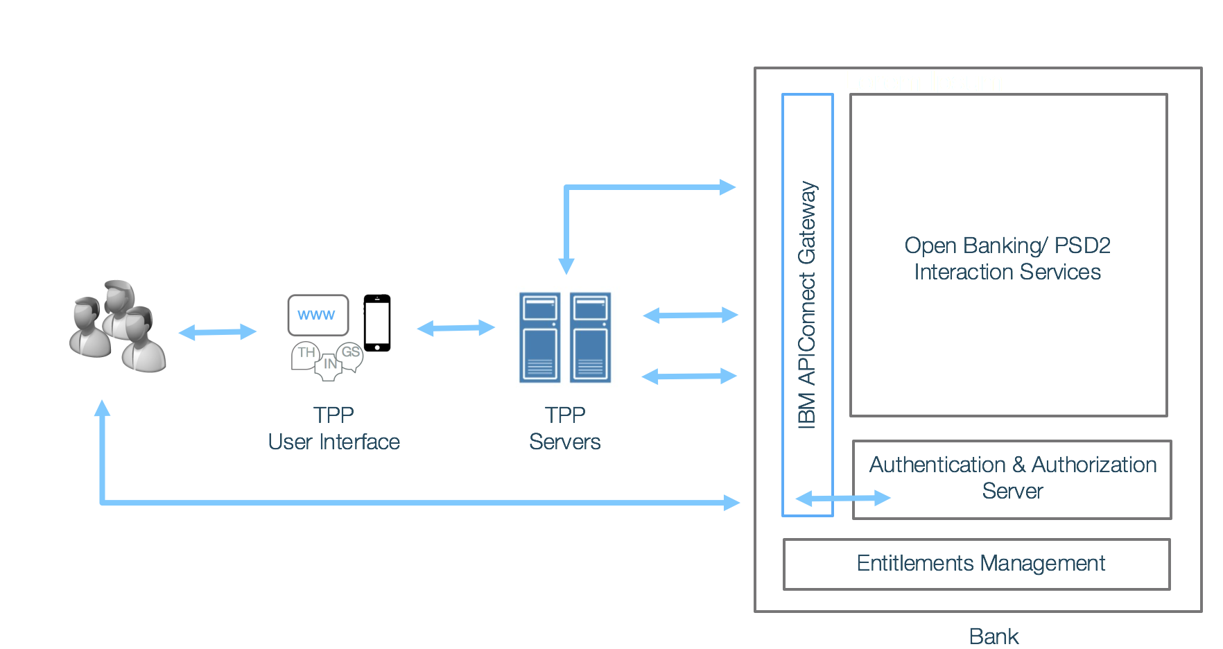
The components in this lab are:
- The Payments API:
- The Payments API is hosted and exposed by a financial institution who wants to allow third parties to make payments on behalf of its customers.
- The payments API is deployed on API Connect has 2 operations
- The first operation is ‘POST /payments’ which allows a third party provider to initiate a payment on behalf of a user. Note this puts the payment in a ‘pending’ state and returns back a payment ID to the third party provider. This operation is secured by API keys only (no oAuth).
- The second operation is ‘POST /payments/{id}/execute’ which allows the third party to finalise a payment and set it to an ‘executed’ state using the payment ID issued in the previous API call. This operation is secured by oAuth, therefore the user has to be redirected by the third party to the financial institution so they can sign in and confirm they authorize the third party to make the payment on their behalf. The oAUth flow handles the interaction between the user, third party provider and financial institution and it uses authorization codes and access tokens to delegate authorization from the user to the third party provider.
- The Payments API is provided for you in this lab.
- Authentication and Authorization Server
- This is the Authentication and Authorization Server (AAS) of the financial institution hosting the payments API.
- The user is redirected to the AAS of the financial institution to sign-in confirm they are happy to give the third party provider permission to make the payment.
- The user signs-in via the web interface of the AA and asked if they approve the payment they are shown on screen.
- If the user confirms the AAS redirects them back to the third party via API Connect.
- The AAS has been provided for you in this lab.
- The Payment Authorization (oAuth 2.0) API:
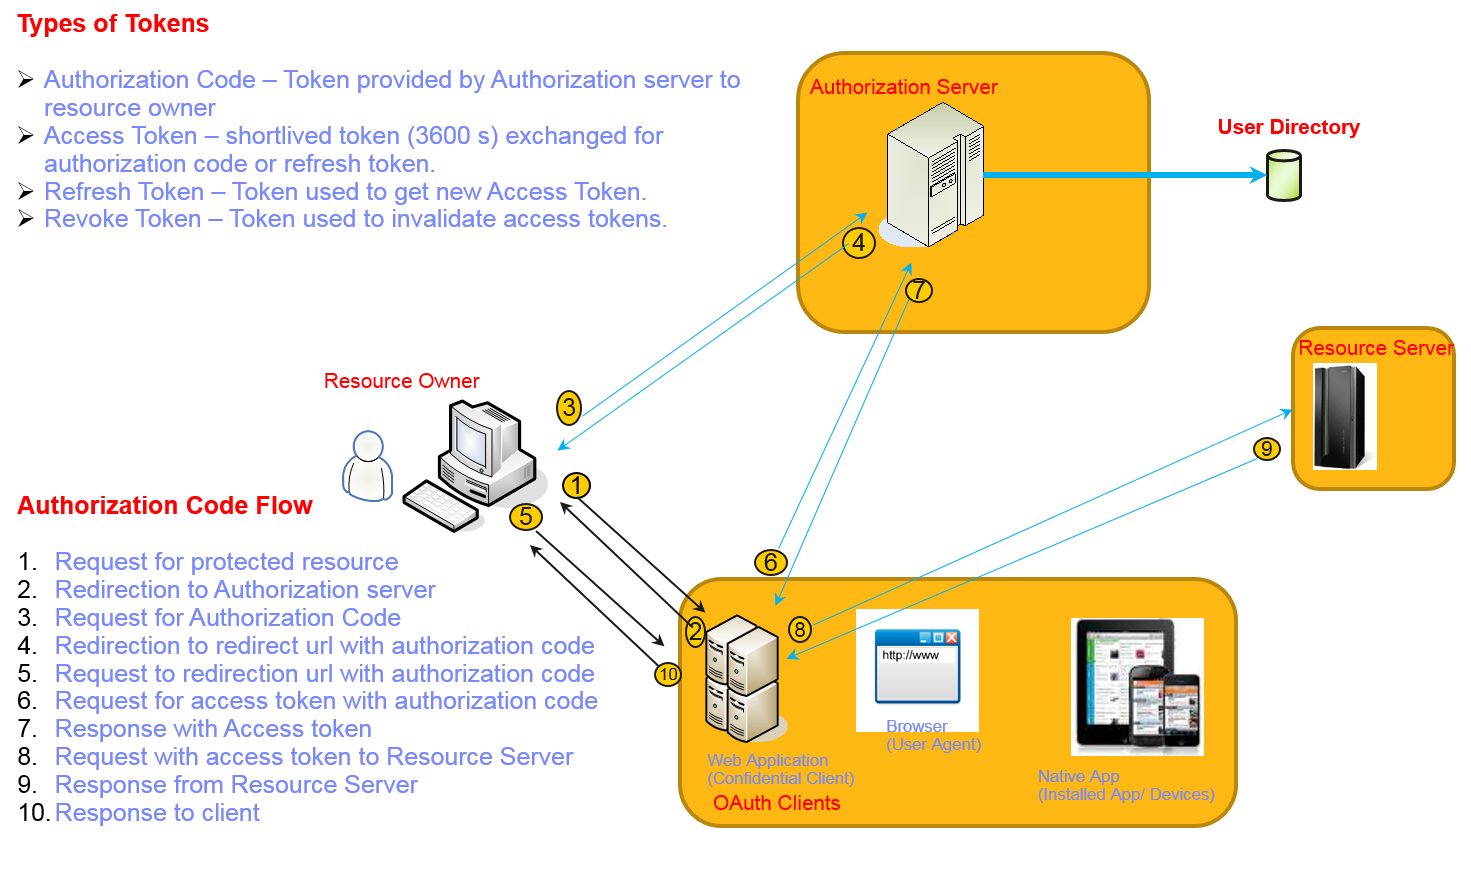
Sequence of Events
The sequence of events to make a payment is:
-
The third party calls the ‘POST /payments’ operation on behalf of the user to initiate the payment. The operation returns a payment ID to the third party.
-
The third party redirects the user to the Authentication and Authorization Server (passing the payment ID) to sign-in, approve the payment and obtain an authorization code.
-
The user (client) passes the authorization code to the third party, and the third party exchanges it for an access token (this is done by calling an operation exposed by the Payment Authorization (oAuth 2.0) API).
-
The third party calls the POST /payments/{id}/execute operation passing the payment ID and access token to execute the payment
Practical Notes
- In this lab you will be acting as the user, user client, financial institution and third party provider.
- All the steps described above (e.g. sequence of events) you will be performing manually so you can understand how the flow and interactions work.
- When running commands, particularly ‘curl’ commands, watch out for spaces and ‘quotes’.
- Each section in the lab has a brief explanation of what you will be performing in that particular section. However, it’s worth keeping in mind the wider picture of what you are building and relate each section back to it.
Part 1: Set up API Connect
This section can be skipped if you already have the API Connect Toolkit installed locally, and a Bluemix account with an API Connect service provisioned. If not, please follow the link below and complete ‘Lab 0 - Setup IBM API Connect’. Once complete, return to this document and move onto part 2.
Setup IBM API Connect Instructions
Part 2: Secure and Test the Payments API
2.1 Create a directory and clone the API Connect project from Github
This section will guide you through the set up of the base API Connect project on your laptop. You will need to have all the prerequisites specified in part 1 in order to perform these steps.
- Navigate to a root folder on your laptop where you would like to keep your apic project
-
Run the following command to create a directory
-
Change to the directory you just created by running the following command
-
Clone the API Connect project from github by running the following command
git clone https://github.com/ibm-apiconnect/faststart-code
-
Change to the directory you just created by running the following command
-
Run the following command to install the required NPM dependencies
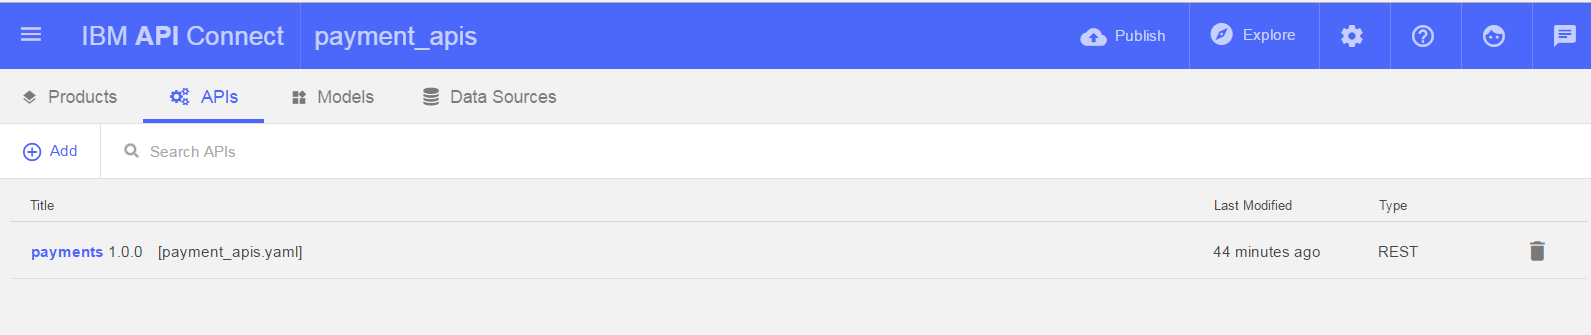
2.2 Exploring the Payments API
This section will help you explore the payments API that is provided for you and the 2 operations it includes. The API is based on loopback and has a model named ‘payment’. An in memory data store is used to store the data associated with the model. It is worth mentioning that if you have an API based on loopback then it has a Node.Js application (microservice) associated with it, as well as the API. This is an important consideration when it comes to deploying your API later, as you have to deploy the application as well as the API product.
-
Run the following command to start the API Connect toolkit:
- The toolkit will open up in your web browser and request you to sign into Bluemix, please do so using your IBM ID and password.
-
You will observe an API already exists named ‘payments’. This uses an in memory database to store details of payments and exposes a number of operations to allow payments to be reserved and later executed.
-
Click on the payments api to go into its design.

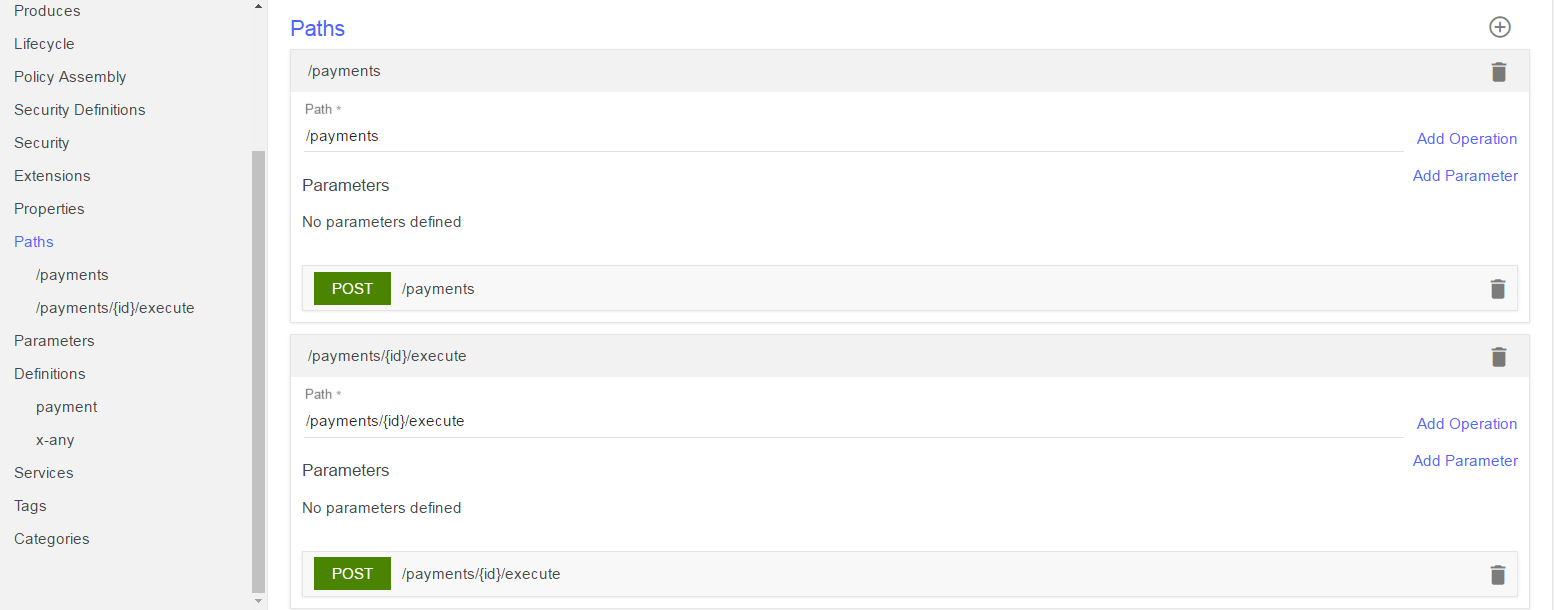
- Scroll down until you can see the paths of the API. You will see 2 paths have been created for you:
- a. POST / payments – this allows a payment reservation to be created and passes back a payment ID
- b. POST payments/{id}/execute – this executes the payment and finalises it. It accepts a payment ID as a parameter in the URL (passed back from operation a).
- Click on the ‘All APIs’ buton on the top left to return back to the main screen.
2.3 Creating the oAuth 2.0 Provider
This section will guide you through the creation and configuration of the oAuth 2.0 provider. The oAuth 2.0 provider will use the ‘Access Code’ flow and will use a redirect to the Authentication and Authorization Server of the financial institution to confirm the users identify and allow them to confirm they want to allow the third party to make payments on their behalf.
-
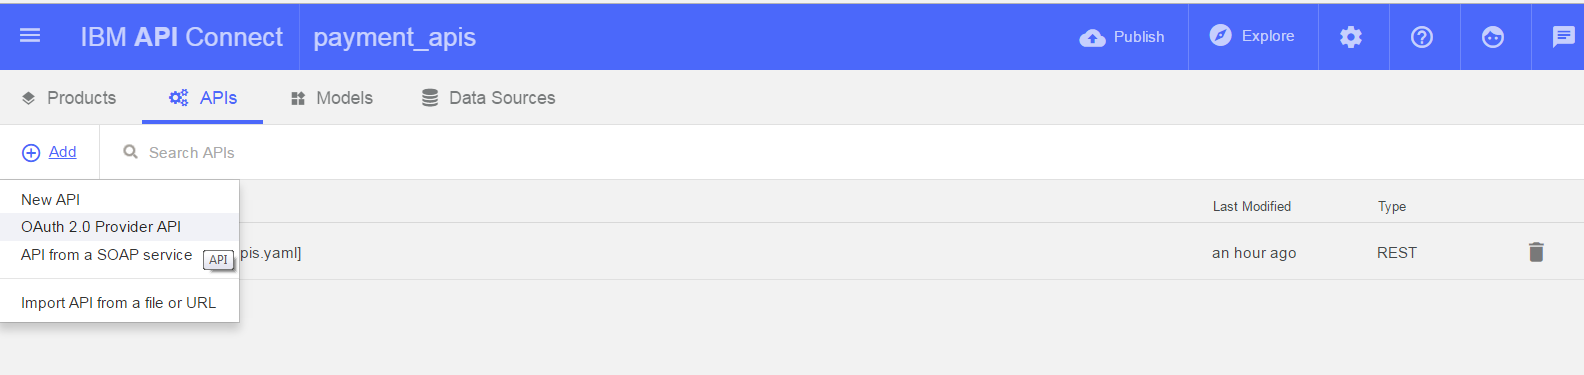
Click on ‘Add’ and select ‘OAuth 2.0 Provider API’.
-
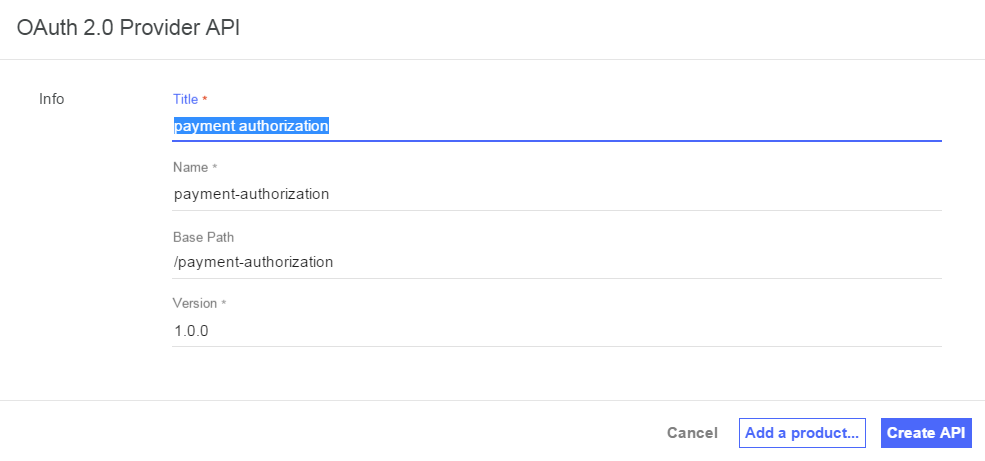
Name the oAuth API ‘payment authorization’ and select ‘Create API’.
-
Scroll down to the oAuth 2 section and set:
- Client Type: Confidential
- Scope Name: payment_approval (delete the other 2 scopes)
- Grants: Check only ‘Access Code’, uncheck the others
- Identify Extraction: Redirect
- Redirect URL: https://aaservergk.eu-gb.mybluemix.net/login
- Authentication URL: https://thinkibm-services.mybluemix.net/auth
- TLS Profile: leave blank
- Authorize application user using: Authenticated
-Leave all other settings as default
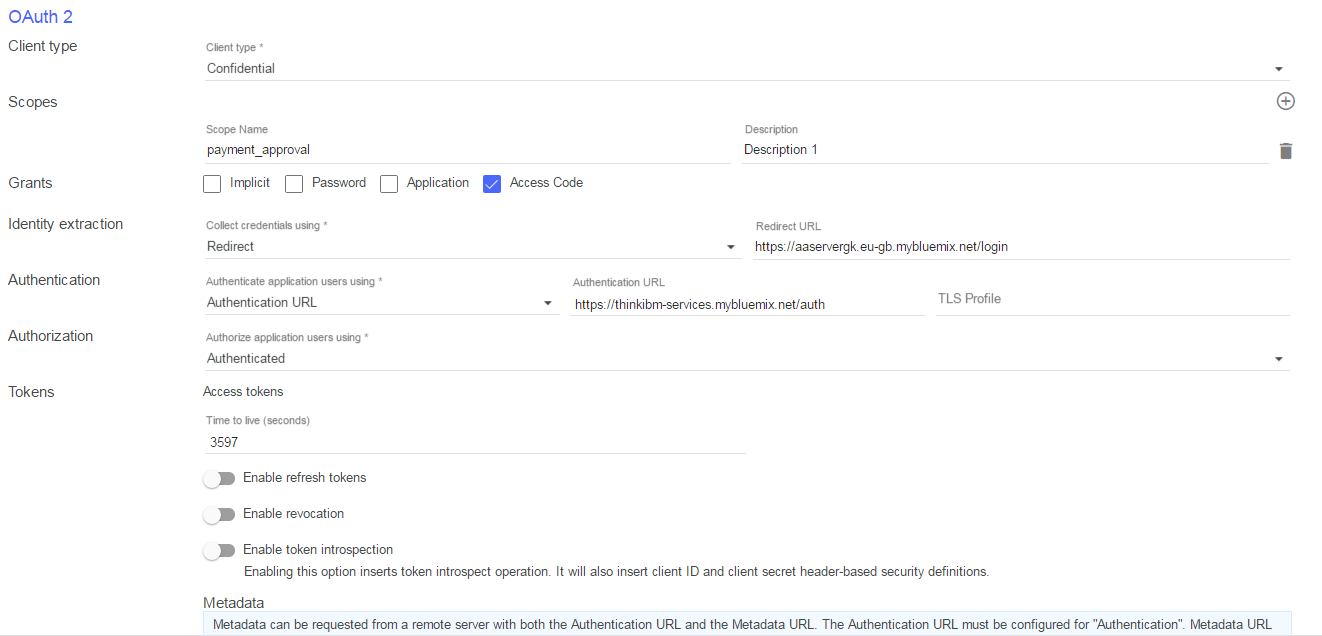
- Click save on the top right.
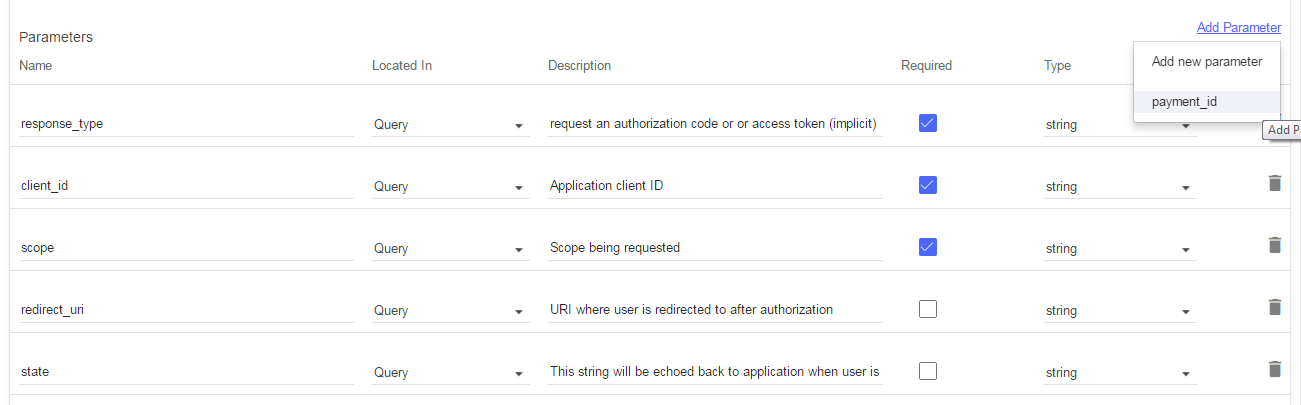
- Scroll down until you see the section to declare parameters.
-
Click the plus icon to create a new parameter, set:
- Name: payment_id
- Located in: Query
- Required: yes (tick)
- Type: String

- Click save on the top right.
- Scroll to the ‘paths’ section of the API.
- Expand the GET /oauth2/authorize
-
Click ‘Add Parameter’ and select ‘payment_id’.
- Click save on the top right.
2.4 Securing the Payments API with the oAuth Provider
This part of the lab will walk you through the steps required to secure the payments API using oAuth 2.0 provider you created in the previous section.
-
a. POST / payments – this operation is secured with a client secret and ID only since it only initiates the payment (i.e. places it in a pending state).
-
b. POST payments/{id}/execute – this operation is secured with oAuth 2.0 (since it’s the operation which executes the payment and finalises the financial transition).
- Press ‘All APIs’ at the top to return to the list of APIs
-
Click on the payments API to go in and see the details.
-
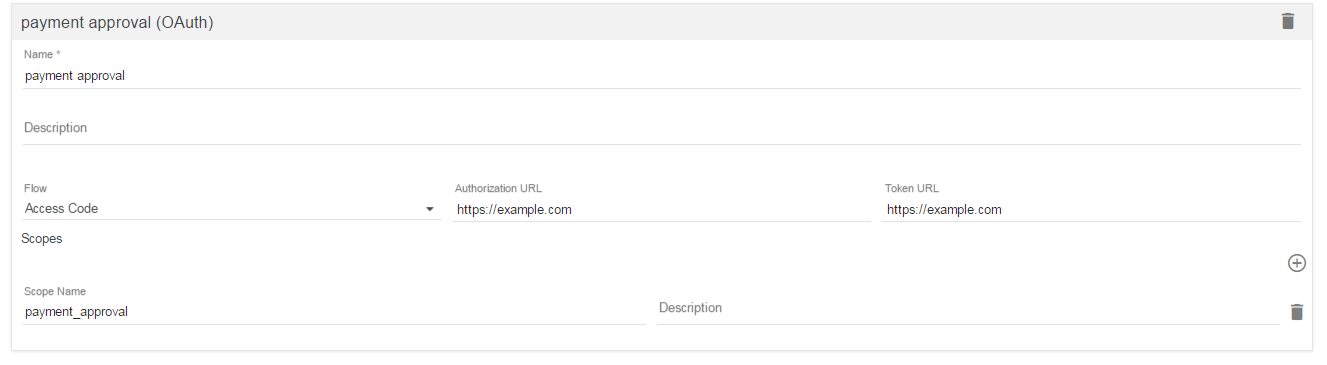
Scroll down to the ‘Security Definitions’ section and click the + icon to create a new security definition. Select oAuth, then set:
- Name: payment approval
- Flow: Access Code
- Authorization URL: see below
- Token URL: see below
- Add a scope using the (+), scope name: payment_approval

The easiest way to get the Authorization and Token URLs is to log onto your API Connect instance on Bluemix and click into the catalogue you are planning to deploy to (e.g. Sandbox). Click on ‘Settings’ on the menu bar then the sub-menu for ‘Endpoints’. Note down the ‘Base URL’.

 The Authorization URL is:

 <Base URL>/payment-authorization/oauth2/authorize

 The Token URL is:

 <Base URL>/payment-authorization/oauth2/token


 An alternative method of retrieving these URLs is described below.

````
Authorization URL is made up of:

https://<bluemix host region url>/<organization-space_name>/<catalog_name>/payment-authorization/oauth2/authorize

For example,
        United Kingdom Bluemix URL: api.eu.apiconnect.ibmcloud.com
        Organization: gary.kean@uk.ibm.com
        Space: APIConnect
        Catalog: workshop-demo

the Authorization URL would look like this:
https://api.eu.apiconnect.ibmcloud.com/garykeanukibmcom-apiconnect/workshop-demo/payment-authorization/oauth2/authorize

Token URL is made up of:

https://<bluemix host region url>/<organization-space_name>/<catalog_name>/payment-authorization/oauth2/token

For example,
        United Kingdom Bluemix URL: api.eu.apiconnect.ibmcloud.com
        Organization: gary.kean@uk.ibm.com
        Space: APIConnect
        Catalog: workshop-demo

the Token URL would look like this:
https://api.eu.apiconnect.ibmcloud.com/garykeanukibmcom-apiconnect/workshop-demo/payment-authorization/oauth2/token

You can double check these URLs in the developer portal later once you have published your API.
````
-
Scroll down to the ‘Paths section of the API.
-
Expand the path for ‘POST payments/{id}/execute’.
-
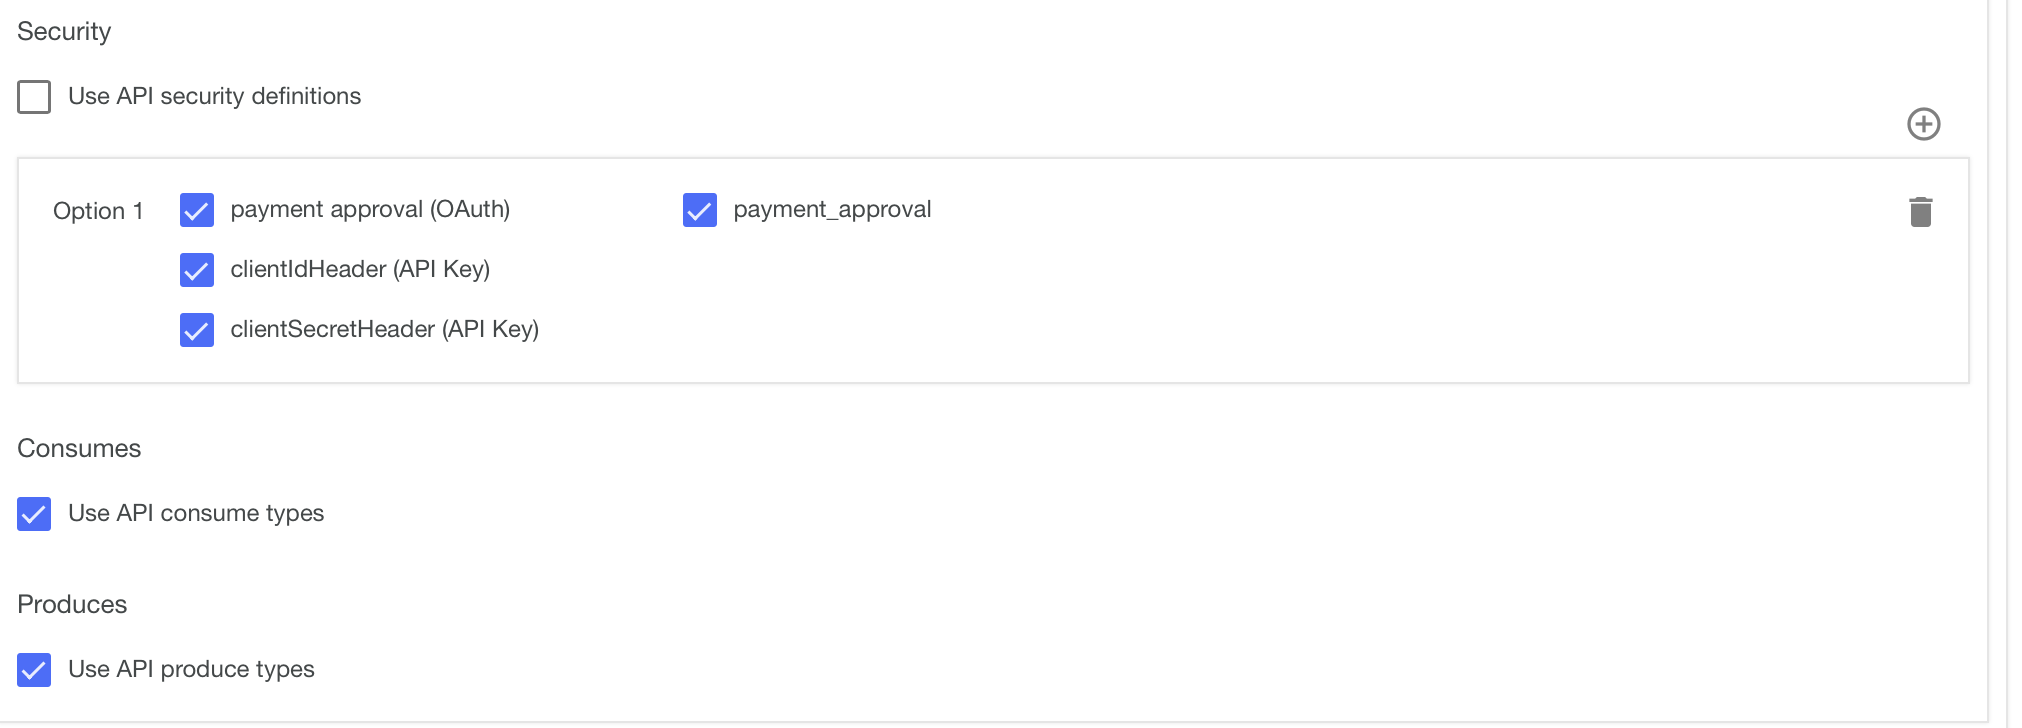
Ensure the security options for the API does not use the ‘API security definitions’ and instead is set to have the ‘payment approval’ oAuth, the clientIdHeader and the clientSecretHeader all set (checked).
- Click save on the top right.
2.5 Adding the oAuth Provider to the Product
In API Connect you package your APIs into products and this is how they are consumed. This section will guide you through packaging up the payments API and the payment authorization API into a single product.
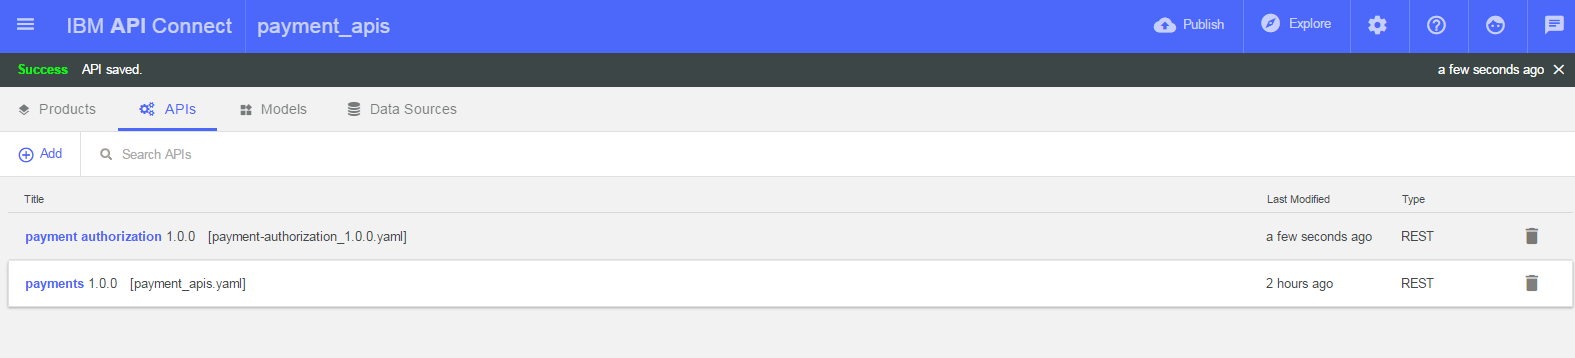
- Press ‘All APIs’ at the top to return to the list of APIs.
- Click on products.
- Click on the ‘Payments’ product to see the details.
-
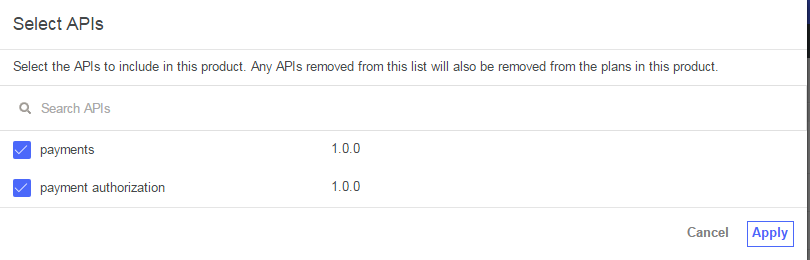
Scroll down to the APIs section and press the (+) button. Check the ‘payment authorization’ API then press ‘apply’ to add it to the product.

- Click on save on the top right.
2.6 Publish Product to Bluemix
Now we have a product, we are ready to publish. In this lab, API Connect on Bluemix is our deployment target. This section will show you how to add Bluemix as a target and how to publish your API and loopback application (microservice).
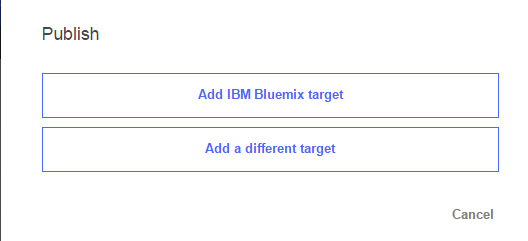
- Hit ‘Publish’ on the top right of the API Connect toolkit
- Click ‘Add and Manage Targets’
-
Select ‘Add IBM Bluemix Target’.
- You should already be signed into Bluemix.
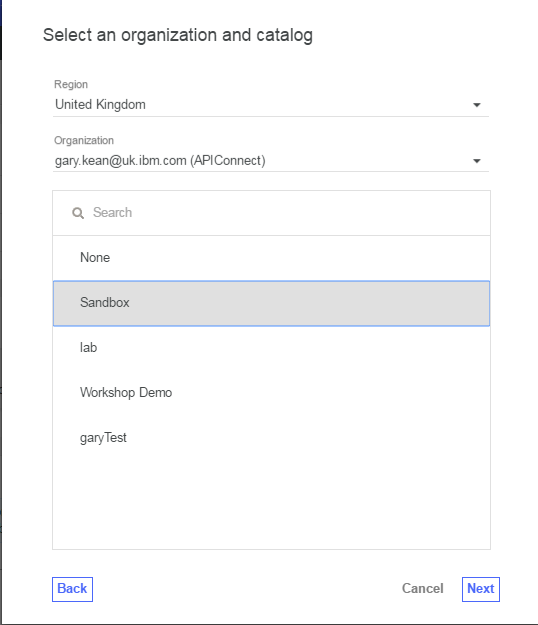
- Select the region and space where you previously created your own API Connect instance. Speak to your instructor if you have not yet done this.
-
Select the catalog you would like to use (the recommendation is to use sandbox) and click ‘next’.
-
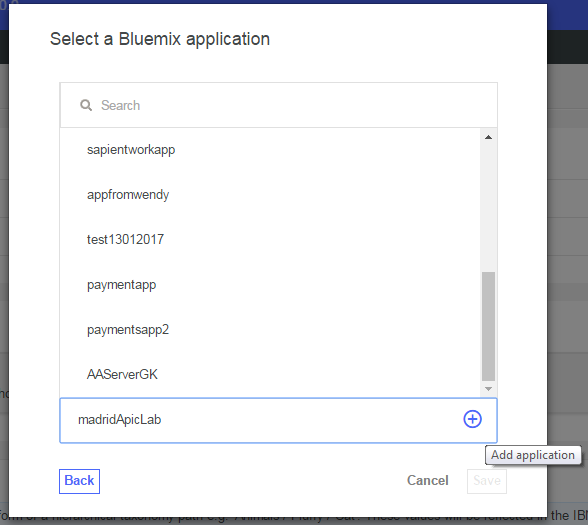
On the screen to select the Bluemix application, type a new application name in at the bottom of the screen (e.g. madridApicLab) then press the + to add the application. Then click save.
-
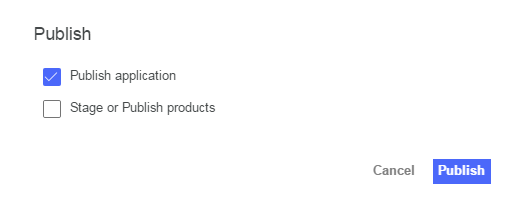
You are returned back to the main API Connect toolkit page. Select the ‘Publish’ button on the top right again. Select the Bluemix target you just set up.
-
Check the ‘Publish Application’ only and hit ‘Publish’.
-
Once published, you will see a ‘Successfully published application’ message.

-
Select the ‘Publish’ button on the top right again. Select the Bluemix target you set up.
-
Select ‘Stage or Publish products’, then ‘Select specific products’ and choose the ‘payments’ product.
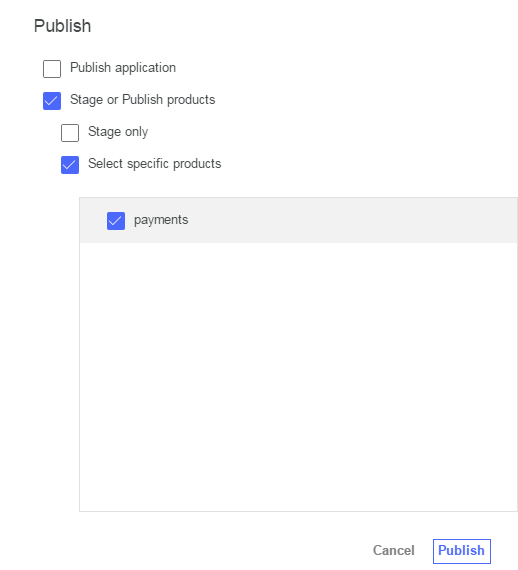
- You will see a message saying ‘Successfully published products’ on the top left.
2.7 Registering an App on the Developer Portal
This is the first part of the lab where we are changing our role (or perspective). Up until now we have been assuming the role of a developer in the financial institution who has published an API to allow third party providers to make payments on behalf of its customers (users).
Now we will be assuming the role of a third party developer who is building an application to make payments on behalf of the banks customers.
The developer portal is a key part of API Connect and is where consumers of APIs go to discover and subscribe to APIs. In order to subscribe to an API you must first create an application.
As a third party developer you will visit the developer portal of the financial institution and register an application.
- Go to your developer portal and sign in using your IBM ID. It may ask you to create an ‘organization’, call this ‘third party’ then click ‘Submit.
- Click on ‘Apps’ in the top menu bar
- Click on ‘Create new app’
- Call the app ‘madridApicOAuthApp’
- In the ‘OAuth Redirect URI’ field enter ‘https://example.com/redirect’ (this specifies where the bank will redirect the user to after oAuth authentication - it’s important it matches the redirect URI specified later)
- Click ‘Submit’
-
Click to show the client secret and client id and note these down somewhere (they will be needed later).

2.8 Subscribing your oAuth Application to the API
As a third party developer, in the previous step you registered an application in the developer portal of the financial institution. You will now subscribe the application you created to the payments API product. This means you can now start to call the payments and payment authorization APIs.
-
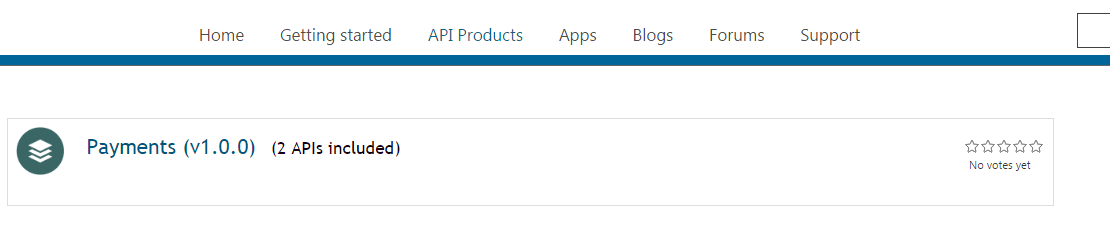
Press the ‘API Products’ button in the menu bar and click on payments
-
Click on ‘Subscribe’ and select the radio button to confirm you want to subscribe your ‘madridApicOAuthApp’ app to the Payments API product.

2.9 Calling the Payments API to initiate the Payment
Everything is now set up from a financial institution perspective (the APIs are published) and from a third party provider perspective (an application is registered and subscribed to the APIs). It is therefore time to start testing the end-to-end flow of making a payment.
Note in reality these the end-to-end payment process would be orchestrated by an application, however for the purposes of the lab, we will do them manually to understand the sequence of events.
The first step is to initiate the payment by calling the POST /payments API.
- On the left hand side, click on the payment API to expand the operations
- Click on the POST /payments API
- Scroll down until you can see the tester for this API on the right hand side
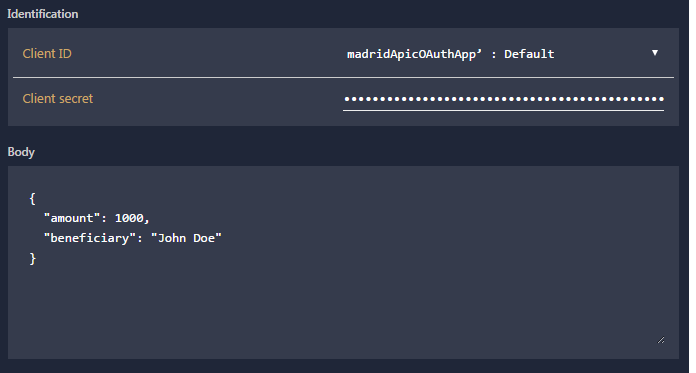
- In the client ID field drop down, select the ‘madridApicOAuthApp’ and enter your client secret from step 2.7.7.
-
In the body enter
        {
          "amount": 1000,
          "beneficiary": "John Doe"
        }
-
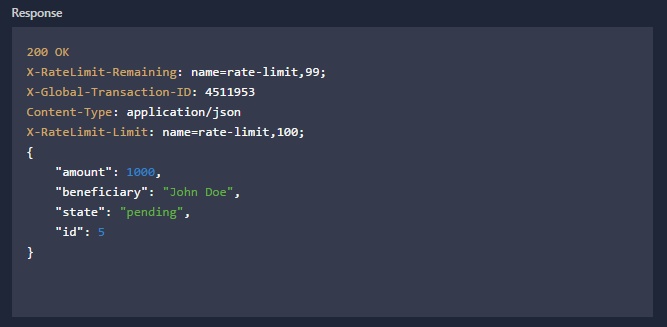
Click the ‘Call Operation’ button and you should observe the response. The response will have the request payload in it plus an ID. Take note of this ID (payment_id) as it will be required later.
2.10 Retrieving the Authorization Code
In this step you will be retrieving the authorization code. The authorization code is the intermediately token given to the users client after they have authenticated with the authentication and authorization server (AAS) of the financial institution and approved the payment. It is an indication that the customer is happy to grant the third party provider access to make the payment on their behalf.
Here you are assuming the role of the customer who is signing into the AAS of the financial institution and giving your permission to the third party provider.
- On the left hand side, click on the payment authorization API to expand the operations
-
Click on the GET /oauth2/authorize operation and you will see a URL in a section named ‘Try this operation’. Take note of this URL, it will look something like
https://api.eu.apiconnect.ibmcloud.com/garykeanukibmcom-apiconnect/lab/payment-authorization/oauth2/authorize

-
You will call the URL you took note of via a web browser, however we must append some parameters to it in order to properly authenticate and get the authorization code. You must add
- response_type=code
- scope=payment_approval
- payment_id= see step 2.9.6
- client_id= see step 2.7.7
- redirect_uri=https://example.com/redirect
Here is an example:
https://api.eu.apiconnect.ibmcloud.com/garykeanukibmcom-apiconnect/workshop-demo/payment-authorization/oauth2/authorize?response_type=code&scope=payment_approval&payment_id=999&client_id=dcebcce4-91ae-4af4-9c14-c812e1677937&redirect_uri=https://example.com/redirect
-
Now call you constructed in the previous step from your web browser (just like you were visiting http://ibm.com). You will be redirected to the external authorization and authentications login page
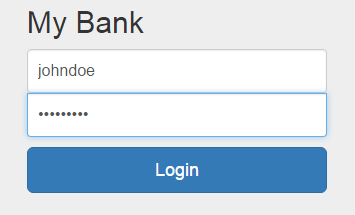
-
Enter
- username=johndoe
- password=password
then click login
-
Click ‘approve payment’
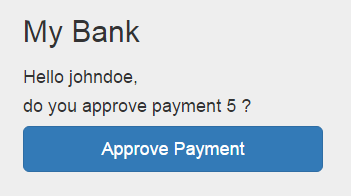
- You will be redirected to ‘example.com/redirect’. Appended to the URL there will be the authorization code you require to obtain the access token in the next step. Copy this code and keep note of it.
The authorization code from the URL below is: AAKm5rxLqxTqUNAnqRQIfg4raNxLxGiI4SWNvIfczRNGFjxm9658XEzcNg25ErFYROEp5OL9Z46EKVi_HLuzHmDiQnT9BoNQ6cAWue9atl2gHQ
https://example.com/redirect?code=AAKm5rxLqxTqUNAnqRQIfg4raNxLxGiI4SWNvIfczRNGFjxm9658XEzcNg25ErFYROEp5OL9Z46EKVi_HLuzHmDiQnT9BoNQ6cAWue9atl2gHQ
2.11 Retrieving the Access Token
In this section you will be retrieving the access token using the authorization code obtained in the previous section.
When the authorization code was received by users client, it was then passed back to the third party provider via the redirect url. The third party provider then calls the POST /oauth2/token operation inside the payment authorization API of the financial institution to exchange the authorization code for the access token.
You are assuming the role of the third party provider in this section.
-
Return back to the developer portal in your web browser and go back to the payments API product.
-
Expand the payment authorization API and select the POST /oauth2/token operation
-
On the right hand side you will see a URL in a section named ‘Try this operation’. Take note of this URL, it will look something like
https://api.eu.apiconnect.ibmcloud.com/garykeanukibmcom-apiconnect/lab/payment-authorization/oauth2/token
-
We will use a ‘curl’ command on the command line/terminal to get the access token from the authorization code. Therefore, open up a new command line/terminal session.
-
Before we can call the command to get the access token, we need to add a few parameters to the command. We must add:
- Client ID= see step 2.7.7
- Client Secret =see step 2.7.7
- grant_type=authorization_code
- redirect_uri=https://example.com/redirect
- code= see step 2.10.7
The structure is:
curl -v -k -u <client id>:<client secret> -X POST -d 'grant_type=authorization_code&redirect_uri=https://example.com/redirect&code=< authorization code>’ '<token url>’
For example:
curl -v -k -u 14e0a9f9-cf4e-4e51-9ac6-c7152ced73ca:pY7gE3vK5oY5pL1dW4pO5hS3uE2dN7gV7pL3fR5xL1tI6vE5uE -X POST -d 'grant_type=authorization_code&redirect_uri=https://example.com/redirect&code=AALHIXey-Vnp6qpoFZqFgrxvU26nkAwn7PVzgxEnFNhcX-CU8nX1yx1DyLzPxDlL279Gz-2QeYy65pTirlE5FEAHcGybo_EqwPGcmykNfps-Fw' 'https://api.eu.apiconnect.ibmcloud.com/garykeanukibmcom-apiconnect/lab/payment-authorization/oauth2/token'
Ensure the spaces between the different parts of the command are correct. If your curl command doesn’t work, also try removing the quotes surrounding the URL for the token.
-
Run the command you constructed in the previous step on the command line/terminal. The response should look like below. Take a note of the access token in the response.
{ “token_type”:”bearer”, “access_token”:”AAEkNTc3YTM5MzMtN2YyMC00NTdlLWI2YWYtZjBjZTNlZTVjZGRjqROf_74P_zTkHshgnZPpiIbWN6_JJyS9MzxPlkD17aRufXpdyaj4D3fgkla-JTRq7UV69n97wpjV0l9odtJeuYYRReX–UhPcyRZXVOVxnU”, “expires_in”:3600, “scope”:”payment_approval” }
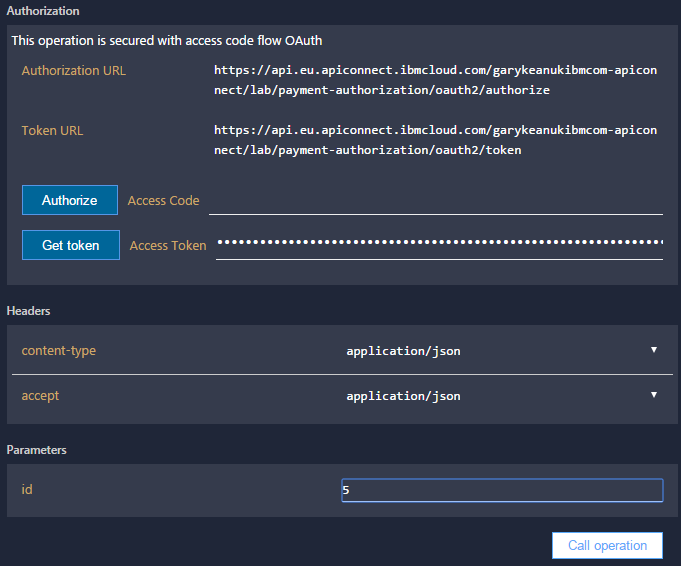
Tip: If you are struggling to get the cURL command to work, then try using the test tool inside the API Connect Developer portal. From there you can use the UI to get the access token from the authorization code. Simply paste in the authorization code to the field named ‘Authorize’ then click ‘Get Token’ - this will automatically populate the access token in the field. The screenshot below illustrates what the UI looks like.
7.The authorization code in generated in the previous section only has a few minutes before it becomes invalid. It may therefore be necessary to repeat section 2.10 and generate a new authorization code.
2.12 Executing the Payment using the Access Token
Now the third party provider has the access token and the payment ID from earlier. It can now finalise the payment by calling the POST /payments/{id}/execute operation inside the payment API of the financial institution.
You are assuming the role of the third party provider in this section.
- Return back to the developer portal in your web browser and go back to the payments API product.
-
Expand the payments API and select the POST /payments/{id}/execute operation.
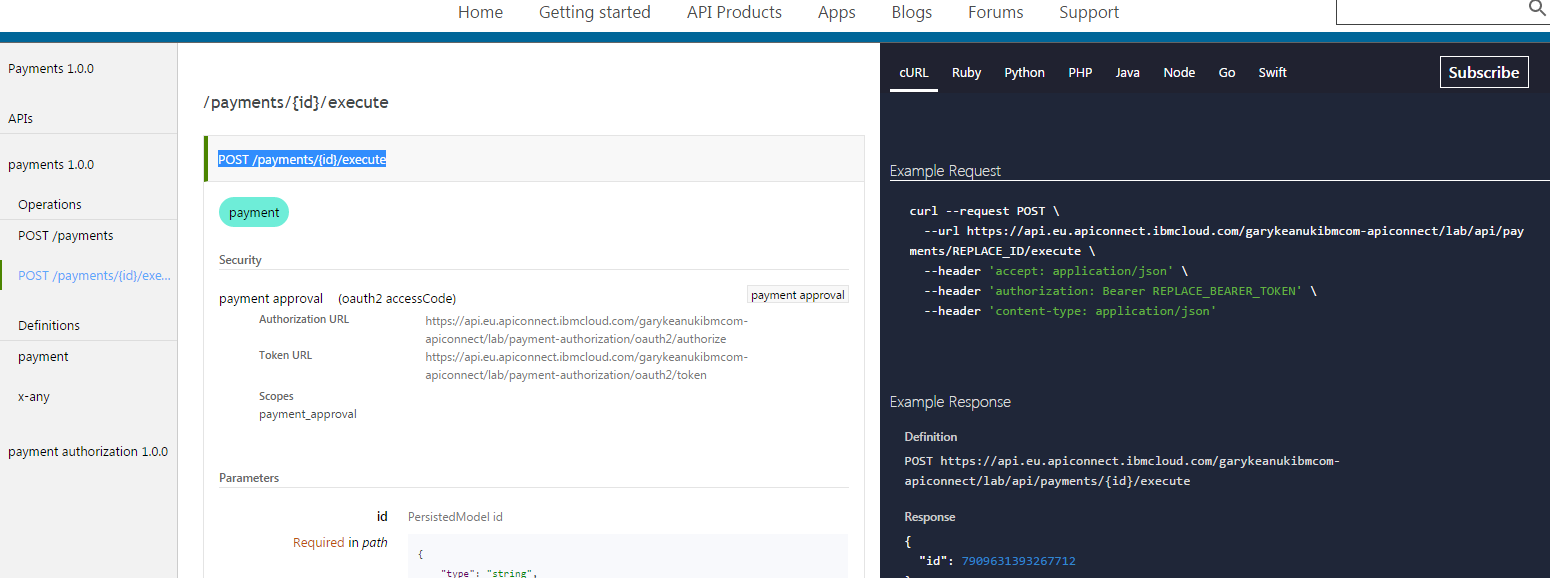
-
Scroll down until you can see the ‘Identification’ section. Select you app name from the ‘Client ID’ drop down and enter your client secret (See step 2.7.7).

-
Scroll down until you can see the ‘Authorization’ section in the tester on the right hand side. Enter your access token (see step 2.11.6).
-
Scroll further down and enter the payment id you are executing in the id field (see step 2.9.6)
-
Click ‘Call Operation’ to execute the call. The response should be the payment_id you specified now with an ‘executed’ state.
    {
    "amount": 1000,
    "beneficiary": "John Doe",
    "state": "executed",
    "id": 5
    }
Conclusion
Congratulations! You have successfully configured the Payments API to use oAuth 2.0.