Update the API Assembly to use DataPower as an enforcement gateway
Your API Connect environment in Bluemix uses IBM DataPower to enforce API policies. You can test the API with a local version of the DataPower gateway running in Docker prior to publishing the API to the cloud.
-
Click on the menu icon in the top left hand corner of the screen and select the
inventoryproject to return to the API definitions section. -
Open the
inventory 1.0.0API definition. -
Click on the
Assembletab to switch views. -
Select
DataPower Gateway Policiesfrom the palette on the left. -
Save the API definition.

Test the Application and API locally
-
On the bottom left-hand corner of the screen, locate and click on the
Runbutton to start theinventoryLoopBack application.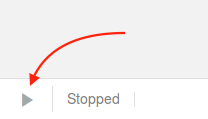
-
Wait a moment while the servers are started. Proceed to the next step when you see the following:
 Note:
Note:
The run process will start your Node.js microservice application and a local Docker container version of the API Gateway (DataPower).
If this is your first time starting an application with a DataPower Gateway policy, the toolkit will need to download the docker image. The image is approximately 750Mb, so it will take a few minutes before you see the gateway service started in the toolkit UI.
If you would like to see the status of the Gateway server, run the following commands from a new terminal window:docker imagesanddocker ps -a. -
Click the
Explorebutton to review your APIs.
-
On the left side of the page, notice the list of paths for the
inventoryAPI. These are the paths and operations that were automatically created for you by the LoopBack framework simply by generating theitemdata model. The operations allow users the ability to create, update, delete and query the data model from the connected data source. -
Click the
Item.findoperation.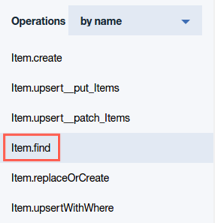
-
By clicking the
Item.findoperation, your screen will auto-focus to the correct location in the window. In the center pane you will see a summary of the operation, as well as optional parameters and responses.On the right side you will see sample code for executing the API in various programming languages and tools such as cURL and an example response.
-
Click on the
Try itlink to view the API test configuration screen.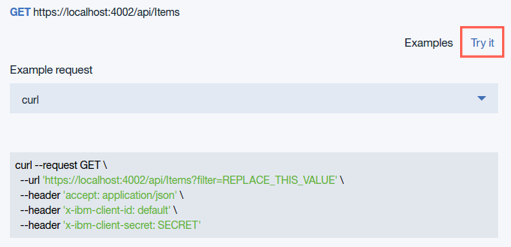
-
Click the
Call operationbutton to invoke the API, scroll down to see the response.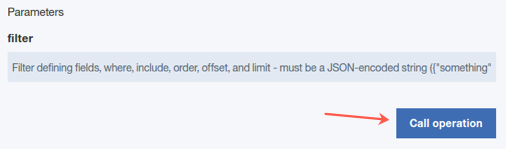
Troubleshooting:
The first time you invoke the API, you may receive an error. The error occurs because the browser does not trust the self-signed certificate from the MicroGateway. To resolve the error, click on the link in the response window and accept the certificate warning.
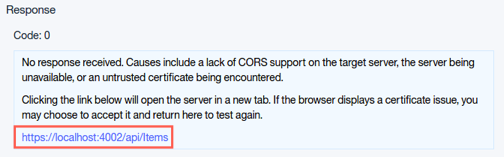
Once complete, return to the API explorer and click on theCall operationbutton again. -
Scroll down to see the
RequestandResponseheaders.Request GET https://localhost:4002/api/Items Headers: Content-Type: application/json Accept: application/json X-IBM-Client-Id: default X-IBM-Client-Secret: SECRETResponse Code: 200 OK Headers: x-ratelimit-remaining: 99 content-type: application/json; charset=utf-8 x-ratelimit-limit: 100 -
Scroll further and the payload returned from the GET request is displayed.
[ { "id": 1, "name": "Dayton Meat Chopper", "description": "Punched-card tabulating machines and ...", "img": "images/items/meat-chopper.jpg", "price": "4599.99" }, ... ] -
Test the
Item.countoperation by following the same process above. You should receive a count of inventory items.{ "count": 12 } -
Click on the
Stopbutton to shut down the running application.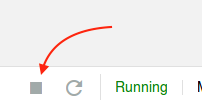
-
Click on the
Xin the top-right portion of the screen to leave the API Explorer view.
Continue
Proceed to Proceed to Lab 2 - Run and Test your API in the Cloud.