In this section you will configure the assembly for the shipping calulation resource. Your API assembly will call out to two separate shipping vendors and provide a consolidated response back to the consumer.
Create the Logistics API Assembly
-
Click on the
logistics 1.0.0API to edit its definition. -
Switch to the
Assembletab and click theCreate assemblybutton. -
Add an
activity-logpolicy to the assembly pipeline. -
Configure the activity-log action to log the
payloadfor the Content field. -
Add an
operation-switchpolicy to the right of the activity-log step. -
The operation-switch editor will open with a single case,
case 0, created by default. -
Next to
case 0, click onsearch operations...to show the drop-down list of available operations. -
Select the
shipping.calcoperation. -
Click the
+ Casebutton to add a second case for theget.storesoperation. -
Click the
Xto close the operation switch configuration editor.You should see two new processing pipelines created on your
operation-switchstep - one for each case: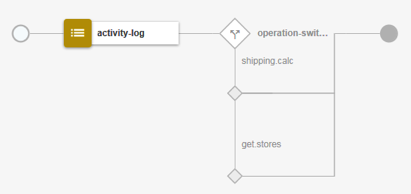
Configure the shipping.calc Case:
This operation will end up invoking two separate back-end services to acquire shipping rates for the respective companies, then utilize a map action to combine the two separate responses back into a single, consolidated message for our consumers.
-
Add an invoke policy to the
shipping.calccase.
-
Edit the invoke action with the following properties:
Title:
invoke_xyzURL:
$(shipping_svc_url)?company=xyz&from_zip=90210&to_zip={zip}Stop on error:
uncheckedResponse object variable (scroll to the bottom):
xyz_response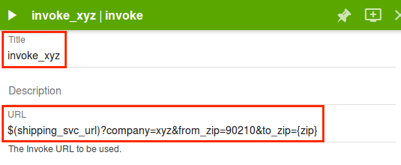

 Note:
Note:
The{zip}parameter provided here is a reference to thezipparameter defined as input to the operation. The{zip}portion of the URL will get replaced by the actual zip code provided by the API consumers. -
Hover over the
invoke_xyzpolicy and click on theclonebutton to add another invoke action: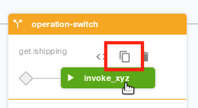
-
Edit the new invoke policy with the following properties:
Title:
invoke_cekURL:
$(shipping_svc_url)?company=cek&from_zip=90210&to_zip={zip}Response object variable:
cek_response

-
Add a
mappolicy after the last invoke, then click it to open the editor.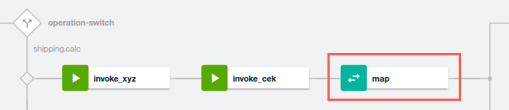
-
Click the pencil button at the top of the Input column, then click on the
+ inputbutton.Enter the following input configuration:
Context variable:
xyz_response.bodyName:
xyzContent type:
application/jsonDefinition:
#/definitions/xyz_shipping_rsp -
Click the
+ inputbutton again to add another input. Specify the following input configuration:Context variable:
cek_response.bodyName:
cekContent type:
application/jsonDefinition:
#/definitions/cek_shipping_rsp -
Paste the same schema definition that was used for the previous input (for our lab purposes, the responses from the shipping service are in the same format, thus using the same schema)
-
You now have two inputs assigned to the
mappolicy: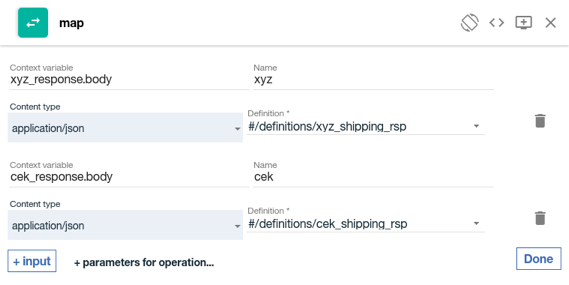
-
Click the
Donebutton to return to the editor. -
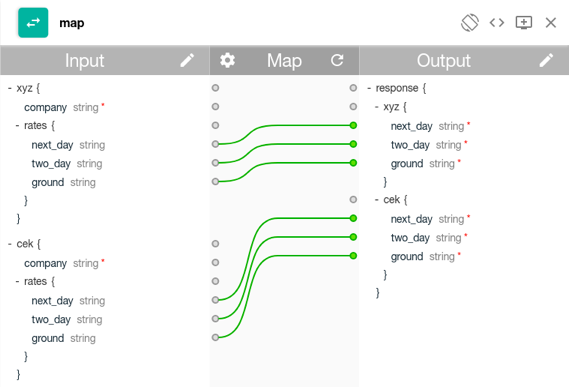
Click the pencil icon at the top of the Output column, then click the
+ outputs for operation...and choose theshipping.calcoperation. -
Set the Content type parameter to
application/json. -
Click the
Donebutton to return to the editor. -
Complete the mapping. To map from an input field to an output field, click the circle next to the source element once, then click the circle next to the target element. A line will be drawn between the two, indicating a mapping from the source to the target.
-
Click the
Xto close the map editor.Your assembly policy for the
shipping.calcoperation is now complete.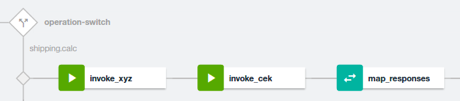
-
Save your changes.

Conclusion
Congratulations, you have just configured an assembly which calls two separate endpoints and aggregates data from each response into a single consolidated response!
Proceed to Using GatewayScript in an Assembly.